
Saturday, 16 February 2019
How to use the Cricut EasyPress 2: Getting Started 101
Watch on YouTube here: How to use the Cricut EasyPress 2: Getting Started 101
Via https://www.youtube.com/channel/UCZmG7q0ghUGZWRklcYp0ybA
Monday, 11 February 2019
Friday, 1 February 2019
Saturday, 12 January 2019
Sunday, 30 December 2018
Tuesday, 27 November 2018
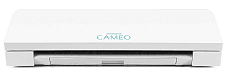
Silhouette Curio vs Cameo 3 – Which Cutter Should you Buy?
If you are feeling a bit confused about whether to buy the Silhouette Curio vs Cameo 3, we are here to help!
Fortunately these two machines have very different features, so by the end of this comparison, you should know exactly what the difference between the Silhouette Cameo 3 vs Curio is.
CYBER MONDAY! See the Cyber Monday & Black Friday Silhouette Cameo 3 sales!
Silhouette Curio vs Cameo 3 Comparison Chart
Below you will find a super handy Silhouette Cameo vs Curio comparison chart.
The chart is great for a visual representation of the difference between the Curio and Cameo 3 cutters.
|
SILHOUETTE CAMEO 3 |
SILHOUETTE CURIO |
|
|---|---|---|
|
Image |
 |
 |
|
Star Rating |
||
|
Cut and Draw |
||
|
Score |
||
|
Emboss and Deboss |
||
|
Etch |
||
|
Stipple |
||
|
Dual Carriages |
||
|
Auto Blade |
||
|
Bluetooth |
||
|
Cutting Size |
12" x 10' |
8.5" x 6" 8.5" x 12" (with large tray purchase) |
|
Cutting Clearance |
2mm |
5mm |
|
Cutting Force |
210 grams |
210 grams |
|
Release Date |
2016 |
2015 |
|
Check Price |
CHECK PRICE | CHECK PRICE |
Summary of Main Difference between the Silhouette Cameo 3 and Curio
The main difference between the Cameo 3 and Curio is that the Silhouette Curio is more versatile, in that it can cut, score, emboss, deboss, etch and stipple.
The Curio has a much smaller cutting surface of 8.5" by 12", compared to the Cameo 3, which has a decent cutting surface of 12" wide and up to 10 feet long.
If you wish to purchase a machine that will be used for cutting, we highly recommend you invest in the Cameo 3, but if you are after a machine that has added features, the Curio might be for you.
Keep reading the rest of the post to find more in-depth information and videos to help you decide which machine is the right one for you!
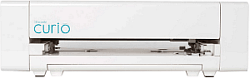
Silhouette Curio Overview
The Curio Cutting Machine is one of the best DIY electric die cutting and embossing machines on the market.
With this nifty machine you can enjoy crafting a wide range of Curio Projects.
This cutter does not only have the ability to cut and draw, but it can also emboss, deboss, score, sketch, stipple, and etch. Pretty impressive huh!?
[easyazon_image align="center" height="500" identifier="B01MRHTLCZ" locale="US" nw="y" src="https://www.thebestvinylcutters.com/wp-content/uploads/2017/06/515JNOojdKL-1.jpg" tag="bestvinylmachines-20" width="500"]
Whilst the machine sounds too good to be true, it does come with its limitations though.
Where the Curio is more versatile than the Cameo Vinyl Cutter, it offers a much smaller cutting size.
The Curio has an 8.5 inch by 12-inch cutting surface, compared to the vinyl cutter Cameo 3, which is capable of cutting 12 inches wide and up to 10 feet long.
Below you will find a quick Silhouette Curio Video to outline all of the positive features of the machine.
The Curio Vinyl Cutter has been designed to be a companion machine to your favorite vinyl cutter, rather than a stand-alone cutter.
[tcb-script type="text/javascript"]amzn_assoc_tracking_id = "bestvinylmachines-20";amzn_assoc_ad_mode = "manual";amzn_assoc_ad_type = "smart";amzn_assoc_marketplace = "amazon";amzn_assoc_region = "US";amzn_assoc_design = "enhanced_links";amzn_assoc_asins = "B00ZOU0W4K";amzn_assoc_placement = "adunit";amzn_assoc_linkid = "4f431b95b72bdb95ea81f64ca7380405";[/tcb-script][tcb-script src="//z-na.amazon-adsystem.com/widgets/onejs?MarketPlace=US"][/tcb-script]
Silhouette Cameo 3 Overview
The Cameo Silhouette 3 is one of the top selling vinyl cutters on the market in 2018. What makes this machine so popular?
[easyazon_image align="center" height="333" identifier="B01I51ME1S" locale="US" nw="y" src="https://www.thebestvinylcutters.com/wp-content/uploads/2017/06/516wlMJPn1L.jpg" tag="bestvinylmachines-20" width="500"]
In comparison to the Curio Plotter, the Cameo 3 is more focused on being brilliant at cutting and drawing. It has the ability to work with over 100+ material and will deliver precise and intricate cutting of designs.
The Silhouette Cameo 3 features a much larger cutting size (12" x 10 feet) and has the very intuitive autoblade which auto-adjusts its blade depth to the material to be cut.
I really feel that the Cameo 3 is the best vinyl cutter for the money.
Below is a quick Silhouette Cameo 3 video to showcase its most prominent features.
[tcb-script type="text/javascript"]amzn_assoc_tracking_id = "wanderlstoryt-20";amzn_assoc_ad_mode = "manual";amzn_assoc_ad_type = "smart";amzn_assoc_marketplace = "amazon";amzn_assoc_region = "US";amzn_assoc_design = "enhanced_links";amzn_assoc_asins = "B01I51ME1S";amzn_assoc_placement = "adunit";amzn_assoc_linkid = "22a62412bbc5f8923f7925928e4b0b59";[/tcb-script][tcb-script src="//z-na.amazon-adsystem.com/widgets/onejs?MarketPlace=US"][/tcb-script]
Both the Curio Plotter and the Cameo 3 has the ability to do two jobs at once, thanks to the dual carriage. They also both use the PixScan software.
>>> READ OUR FULL CAMEO SILHOUETTE 3 REVIEW
>>> GRAB THE BEST CAMEO 3 BUNDLE DEAL
What can the Curio Cutter do that the Cameo 3 machine can’t?
Let's take a closer look at the Curio Silhouette vs Cameo 3.
The Curio can tackle a large variety of gorgeous Silhouette Curio projects.
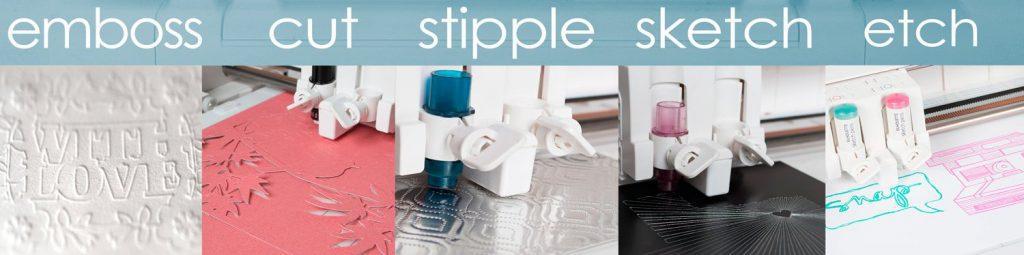
More specifically the Curio has the following unique features:
- Stipple Metal and Foil
- Etch Metal
- Emboss and Deboss
- Score
- Can work with much thicker materials (up to 5mm thick in comparison to Cameo's 2mm)
What can the Cameo 3 do that the Curio machine can’t?
The Silhouette Cameo Version 3 has its own set of brilliant features and these include:
- Bluetooth Technology
- Ability to use the machine without a computer
- Larger cutting surface (12" x 10 foot) in comparison to Curio's tiny 8.5" x 6" (which you can extend to 8.5" x 12" if you purchase the silhouette curio large base set)
- Autoblade Feature - the autoblade will auto-adjust its cutting to the depth of the material you are using.
Curio vs Cameo 3 Comparison Video
Here is a great video showcasing how the Silhouette Curio Cutting Tool stacks up against the Cameo 3 Silhouette.
The video clearly outlines the difference between the Silhouette Curio vs Silhouette Cameo 3 Vinyl Cutter.
Which one is the one for you?
Have you managed to figure out which one is for you? Let's break it down further to see whether the Curio Silhouette or Cameo is for you.
Do you need a machine that can emboss, deboss, etch, stipple as well as draw and cut?
- The Curio has a lot more functions on offer, but the compromise is that your working space is pretty small.
Do you need a machine that has a decent cutting size on offer?
- The Cameo 3 is perfect for those who wish to work on larger cutting surfaces. It is a popular machine for scrapbookers as well as sign-makers and T shirt transfer businesses.
Do you want to have your machine away from your computer and out of the way?
- The Cameo 3 has bluetooth which means it can talk to your computer wirelessly.
Do you want the cheapest machine?
- The Curio is slightly older, being released a year before the Cameo 3, and therefore comes at a cheaper price.
Remember, the Curio was designed to accompany your current vinyl cutter. If this is your first vinyl cutter purchase, we highly recommend the Cameo 3.
If you have a great vinyl cutter and you want to add the versatility of adding embossing, etching and stippling features to your projects, then we suggest you purchase the Curio.
If you have some money to invest, you could also look at getting the perfect combination of both machines together!
PURCHASE CAMEO 3PURCHASE THE CURIO
Still not sure if these vinyl cutters are right for you? Why not read our super helpful and detailed vinyl cutter reviews guide or try our die cut machine comparison guide if you are a paper crafter.
And once you have purchased your machine, you might like to check out our list of free SVG files for silhouette available for download.
Over to You
- Which one will you buy? The Silhouette Cameo or Curio?
- Do you think the Silhouette Curio Digital Crafting Machine is worth the money?
- Which machine do you think won the great Cameo Curio battle-off?
- Can you add any more helpful info for our readers to help you decide between the Silhouette Cameo 3 vs Silhouette Curio
PLEASE PIN ME

Silhouette Curio vs Cameo 3 – Which Cutter Should you Buy? is republished from: https://www.thebestvinylcutters.com/
Saturday, 24 November 2018
10 of the Absolute Best Cricut Gift Ideas of 2019!
So you know someone who is in love with anything and all things Cricut. We will share some top-notch gift ideas of what you can purchase for the Cricut fan in your life.
From the newest and latest Cricut machines to Cricut accessories, tools, storage and more! Here is a list of the best Cricut gift ideas of 2019!
The Absolute Best Cricut Gift Ideas of 2019
Find below a list of our favorite Cricut products for 2019. You can't go wrong with this products. Everybody wants them because they are new, they are pretty and they are fun.
1. The Cricut EasyPress 2
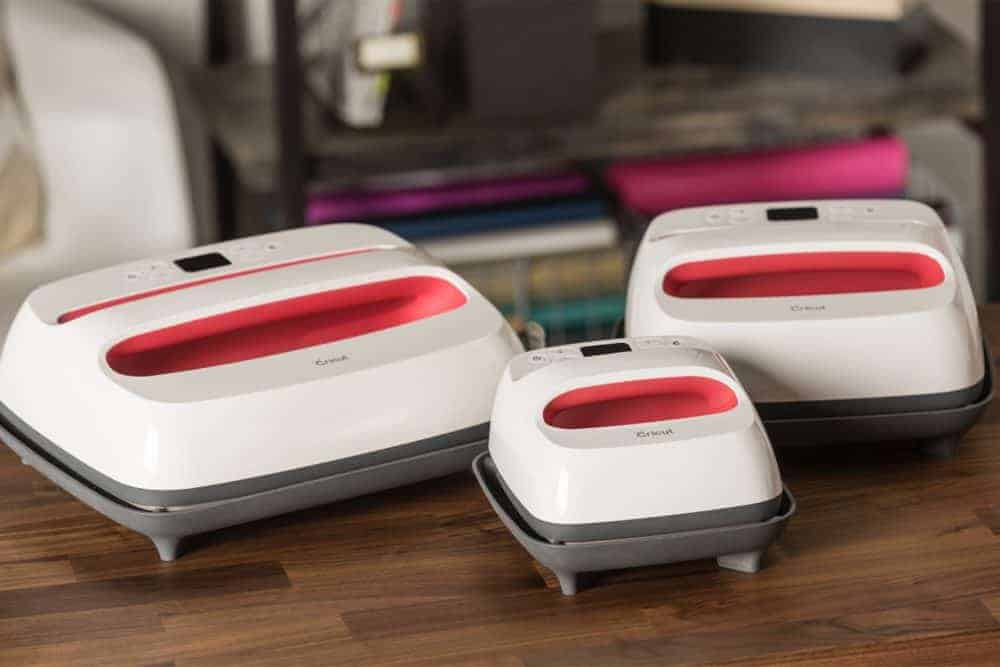
The Cricut EasyPress 2 is brand new! I know that crafters all have a secret desire to have the newest and latest of everything and this is it! The newest release by Cricut.
The EasyPress is great for those who love working with vinyl designs. Those who love making their own custom shirts, bags, backpacks, hats and more.
[easyazon_image align="center" cart="n" cloak="n" height="569" identifier="B07G51F71X" locale="US" localize="y" nw="y" nf="y" src="https://www.thebestvinylcutters.com/wp-content/uploads/2018/11/71MDzUpzsnL.jpg" tag="bestvinylmachines-20" width="850"]
The press is available in three nifty sizes - 6 x 7", 9 x 9" and 10 x 12". Not sure what size to get? The 9 x 9" is by far the most popular. But we have a handy post here that will walk you through trying to figure out which size would be best for the Cricut fanatic in your life.
Everybody wants an EasyPress, most crafters see this item as a "SPLURGE" item rather than a necessary item, which means that it would make the perfect gift.
Does this sound like the perfect gift?
You can click here to quickly check the latest pricing of the EasyPress 2 on Amazon.
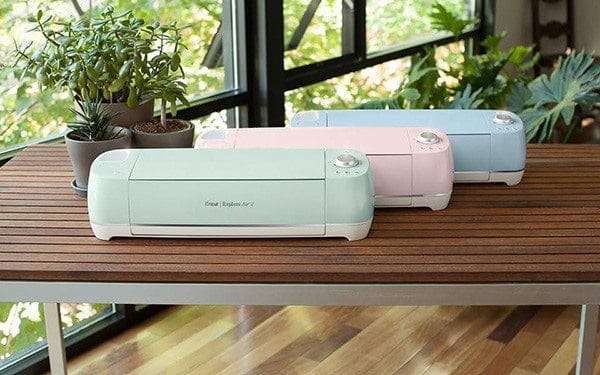
2. Cricut Maker Cutting Machine

Not limited with $$$ for the gift and really after a gift that will 'WOW' the socks of your Cricut fan?
The Cricut Maker is by far the most impressive cutting machine on the market currently. This machine can cut anything and everything. It is especially a brilliant gift for those who love working with fabric, vinyl or cardstock.
[easyazon_image align="center" cart="n" cloak="n" height="569" identifier="B072VYPWM4" locale="US" localize="y" nw="y" nf="y" src="https://www.thebestvinylcutters.com/wp-content/uploads/2018/11/91cffpQlm2L.jpg" tag="bestvinylmachines-20" width="850"]
You can either grab the machine by itself or if you are really keen, you can purchase a whole Cricut Maker bundle (which will include all sorts of extras, from tools, accessories and more!).
- Click here to see our favorite Cricut Maker bundles.
- Click here to read our review of the Cricut Maker.
Does this sound like the perfect gift?
Click here to check current pricing for the Cricut Maker machine.
3. Cricut Ultimate Fine Point Pen Set

After something a little bit cheaper? Or maybe A LOT cheaper? That is fair enough!
This Cricut Ultimate Fine Point Pen set is a brilliant gift. Nobody likes spending their own $$$ on pens when you can purchase all sorts of pretty stuff like ribbons and pretty paper instead. But all crafters need pens! So this gift will definitely be practical and handy.
There are 30 gorgeous colors in this set and are just the thing to use with Cricut’s drawing features.
Does this sound like the perfect gift?
Click here to check current pricing for the Cricut Fine Point Pen Set.
4. Cricut Essential Tool Set
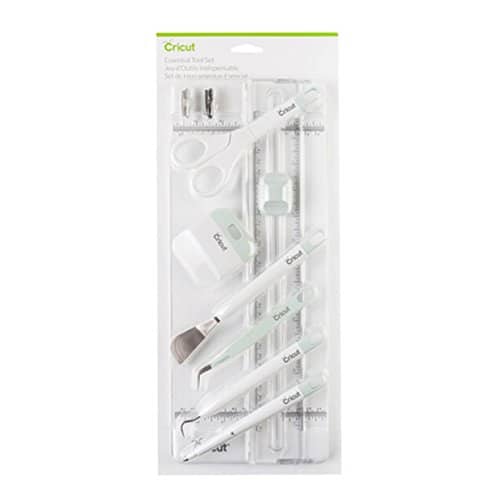
Another really affordable and fabulous Cricut gift is this Essential Tool Set!
Your Cricut fan might already have these tools, but as with any tools, they wear down and eventually, you have to replace them with new ones. I can promise you now that these tools WILL GET USED.
The set includes scissors, a scraper, a spatula, tweezers, a weeder, a scoring stylus, and a paper trimmer (with blade replacement and scoring blade).
Does this sound like the perfect gift?
Click here to check current pricing for the Cricut Essential Tool Set.
5. Cricut Explore Air 2 Cutting Machine
Our best selling machine here from The Best Vinyl Cutters is for sure the Cricut Explore Air 2 cutter. This machine is truly a fabulous machine for a fabulous price.
Most crafters can't reach the high price tag of the Cricut Maker and this is definitely the next best thing.
A fabulous DIY cutting machine that allows you to work with over 50+ different types of material.
You can either grab the machine by itself or if you are really keen, you can purchase a whole Cricut Explore Air 2 bundle (which will include all sorts of extras, from tools, accessories and more!).
- Click here to see our favorite Cricut Explore Air 2 bundles.
- Click here to read our review of the Cricut Explore Air 2 Machine.
Does this sound like the perfect gift?
Click here to check current pricing for the Cricut Explore Air 2 machine.
6. Cricut Rotary Cutting Kit
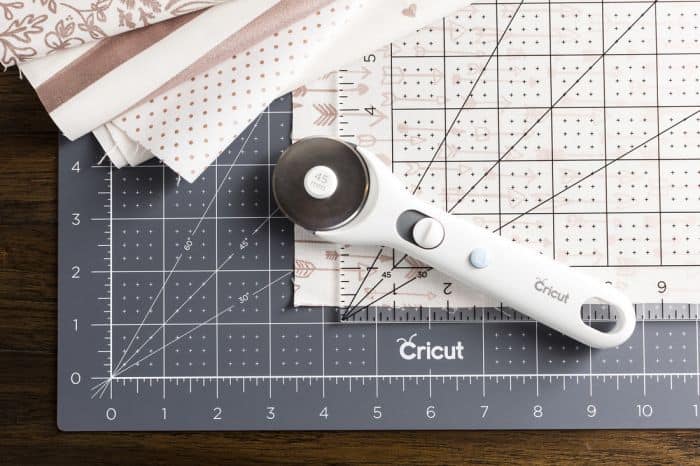
This kit is brilliant for anyone who loves working with fabric. So if your Cricut fan makes things like toys, pillows, quilts, soft toys etc. then this will be a great gift for him/her.
The Cricut Rotary Cutting Kit includes:
• 45 mm Rotary Cutter
• Longer-lasting 18” x 24” double-sided self-healing mat
• Oversized 12” x 24” Acrylic Ruler
Does this sound like the perfect gift?
Click here to check current pricing for the Cricut Rotary Cutting Kit
7. Online Class
Now, if you think that your Cricut fan has absolutely all the tools, accessories and machines that they could possibly wish for, another great idea is an online Cricut class.
It is always fun to learn new skills. These classes are online and you can complete them in your own time and from the comfort of your own home.
You can find all sorts of inspiring classes online.
We love trying out classes on Craftsy.
8. Cricut Rolling Tote
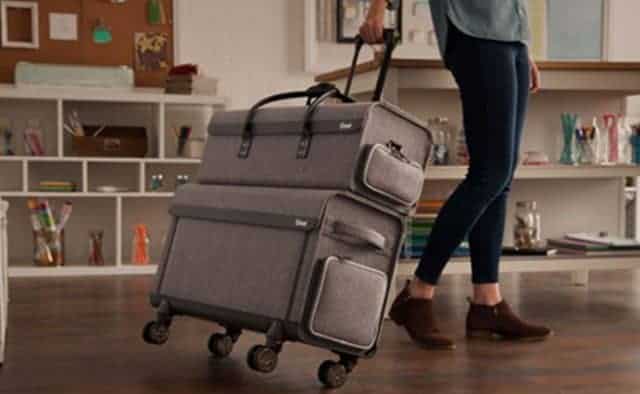
These bags are brilliant for anybody who loves crafting away from home.
Simply pop your cutting machine in the bag and add some supplies in the pockets - and you are ready to go!
What makes these rolling totes so fabulous?
• Easy rolling premium craft bag
• Hand-crafted, quality construction
• Multiple compartments, pockets, and detachable storage
• Specially designed to hold rolls of vinyl, iron-on and more
• Multi-directional wheels roll in any direction
• Machine and supplies sold separately
The bags measure L: 26", W: 10.25", H: 14.38" - so it is important to check that their machine will actually fit in this bag.
Does this sound like the perfect gift?
Click here to check current pricing for the Cricut Rolling Tote
9. Cricut BrightPad
[easyazon_image align="center" cart="n" cloak="n" height="569" identifier="B072ND9W9V" locale="US" localize="y" nw="y" nf="y" src="https://www.thebestvinylcutters.com/wp-content/uploads/2018/11/81IShBEd4AL.jpg" tag="bestvinylmachines-20" width="850"]
The Cricut BrightPad™ is a brilliant companion for any crafter that needs to illuminate projects for easier crafting and reduced eye strain.
You can use it for things such as tracing, weeding, quilting, and more.
It is easy to carry around and easy to store.
Does this sound like the perfect gift?
Click here to check current pricing for the Cricut BrightPad
10. A Year Subscription to Cricut Access

What is so magical about the Cricut Design Space?
- It has over 50,000 images for you to choose from
- It has more than 800 predesigned Make it Now projects. These projects are ready to go and all you have to do is to click that magical button called “Go”.
- You can upload your own jpeg and SVG files.
- You can add your own fonts.
- It works from a desktop, laptop, tablet, and phone – hello to lazy designing form your couch!
Now every person that owns a Cricut machine will most likely have to subscribe to Cricut Access. It only makes logical sense to do so. But it is one of those things that you hate spending your own money on - so I know that if it was me - this would be a perfect gift!
You can read more about the benefits of subscribing to the new Cricut Design Space & Cricut Access here.
Does this sound like the perfect gift?
Click here to purchase a year subscription to Cricut Access
And there you have it! 10 Fabulous Cricut gift ideas that any Cricut fanatic would love to receive.
Please leave us a comment and let us know which gift you decided to purchase.
10 of the Absolute Best Cricut Gift Ideas of 2019! was first published on: The Best Vinyl Cutters
Thursday, 22 November 2018
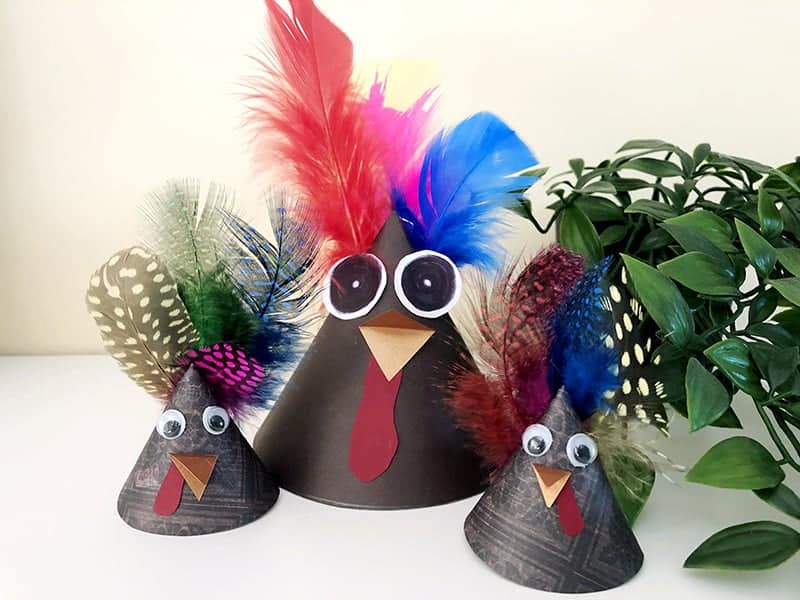
Super Cute DIY Thanksgiving Turkey Craft Idea for Kids
Looking for one of the best Thanksgiving turkey crafts for kids?
These birds are so funky! I love their bright feathers, I love those googly eyes and I think they make sweet Thanksgiving table decorations.
If you want to make a turkey craft with your kids, these are brilliant for older kids, aged 8+.
I made them with my 9 year old daughter and she loved making them, but she also got a bit frustrated in some steps. Which is why I have shared some tips in my instructions below on how to make this Thanksgiving turkey craft idea a bit easier.
You can find all the information below.
DIY Thanksgiving Turkey Craft Idea for Kids
Find below all the supplies and the step-by-step instructions that you will need to create your DIY Turkey craft project.
As a disclaimer, credit of this project goes to Crafty Morning. She has a tutorial on her blog on how to whip up these birds as party hats! So hop over to her page if you wish to extend this project.
I have added a few helpful tips in my tutorial to make the craft a bit easier (I got a bit frustrated during some steps), so make sure to browse through our steps below as well.
Materials:
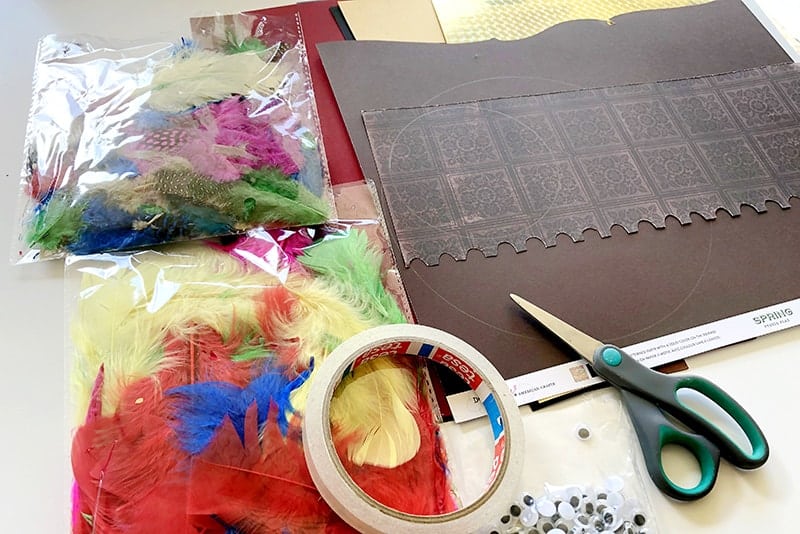
- Brown, Orange & Red Thick Paper
- Sticky Tape
- Bright Colored Feathers
- Googly Eyes
- Glue
- White Paper
- Sharpie Pen
- Scissors
Instructions:
Step 1: Draw a circle onto your brown paper. I just used some lids from some Tupperware in the kitchen. Cut the circle out and then cut it in half. One half-circle will make one turkey, so set the other half aside for now.
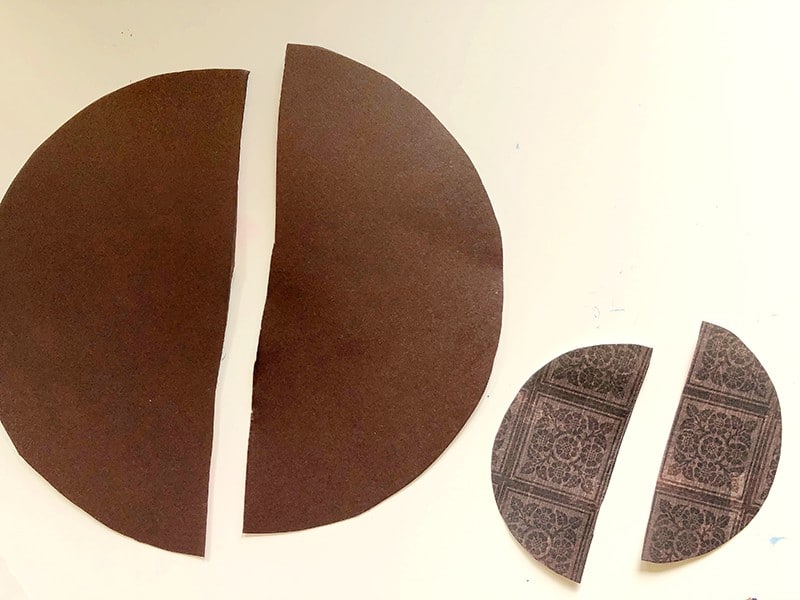
Step 2: Bend the two corners of the half-circle towards each other to form a cone shape. Use some sticky tape to secure your cone.
Tip: I found that I had to reinforce my sticky tape as they kept coming undone, so best to add a bit more sticky tape or some staples (if your cone is large enough) to ensure it is secure.
Step 3: Choose your feathers and organize your arrangement. I found it easiest to sticky tape them together like a bouquet of flowers.
Tip: After struggling with the first turkey and the feathers, I ended up stripping off the feathers towards the bottom. It was easier to sticky tape them together without all the feathery fuzz getting in the way.

Step 4: Next use some more sticky tape to adhere your bouquet of feathers to the back of the turkey.
Step 5: Next stick on some googly eyes or create your own funky eyes by simply drawing some pupils with a sharpie onto some whitepaper. Sticky liquid glue works really well to adhere the eyes (or you could try a glue gun?).
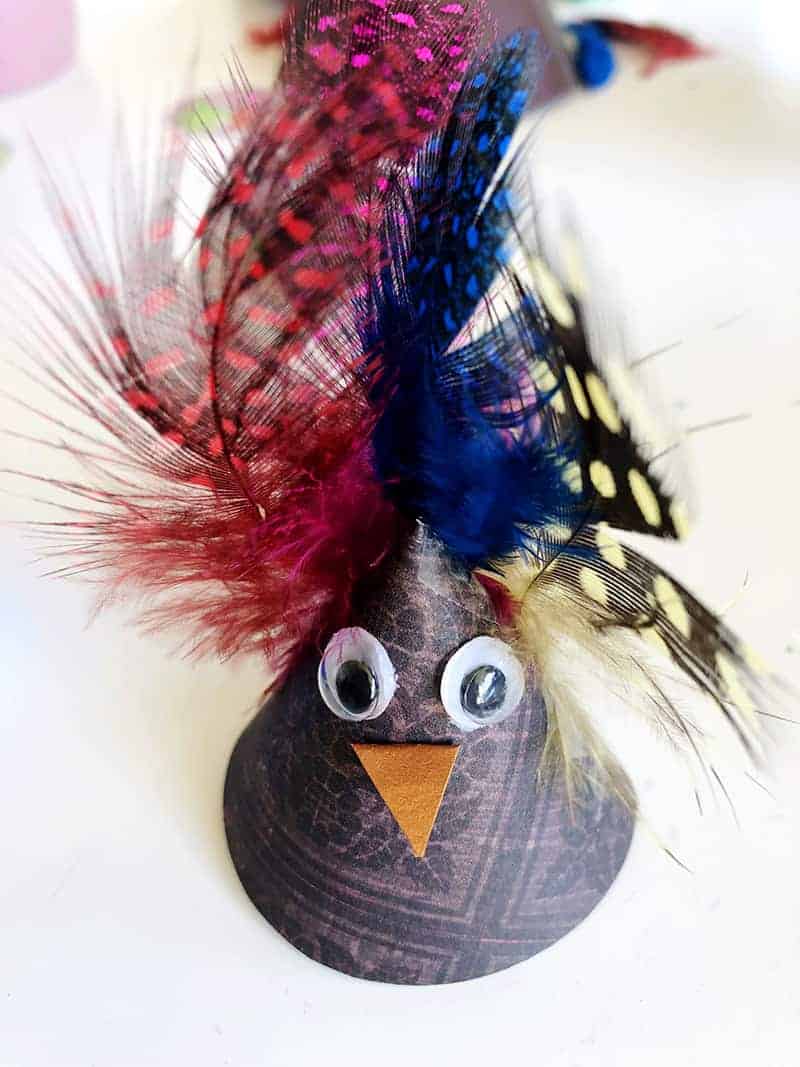
Step 6: Fold some orange paper longways. Next cut out a triangle shape on the fold in order to create a beak. Cut out a wonky snood for the turkey and stick these under the eyes.
And you are done!
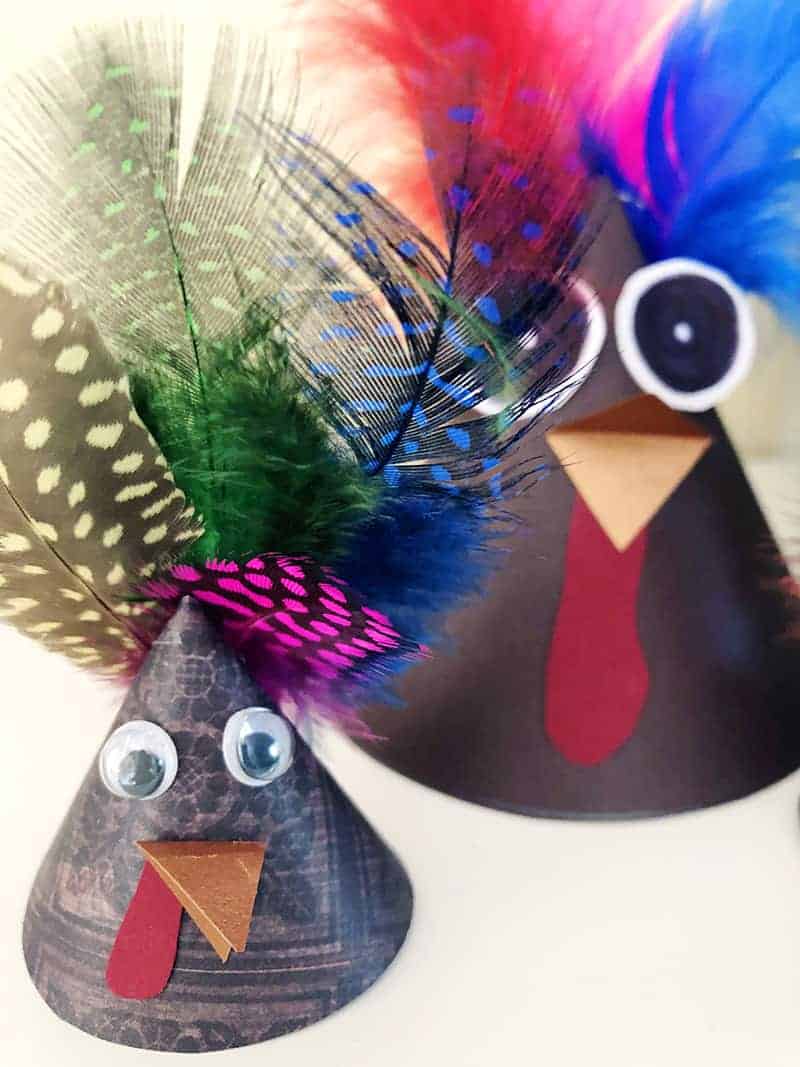
And there you have possibly the cutest turkey craft project in the world - don't you think!? I hope you guys have loads of fun whipping up these colorful wonky thanksgiving birds.
If you have any questions, please leave them in the comments below.
Till next time,
Samantha xxx
Super Cute DIY Thanksgiving Turkey Craft Idea for Kids is available on: thebestvinylcutters.com
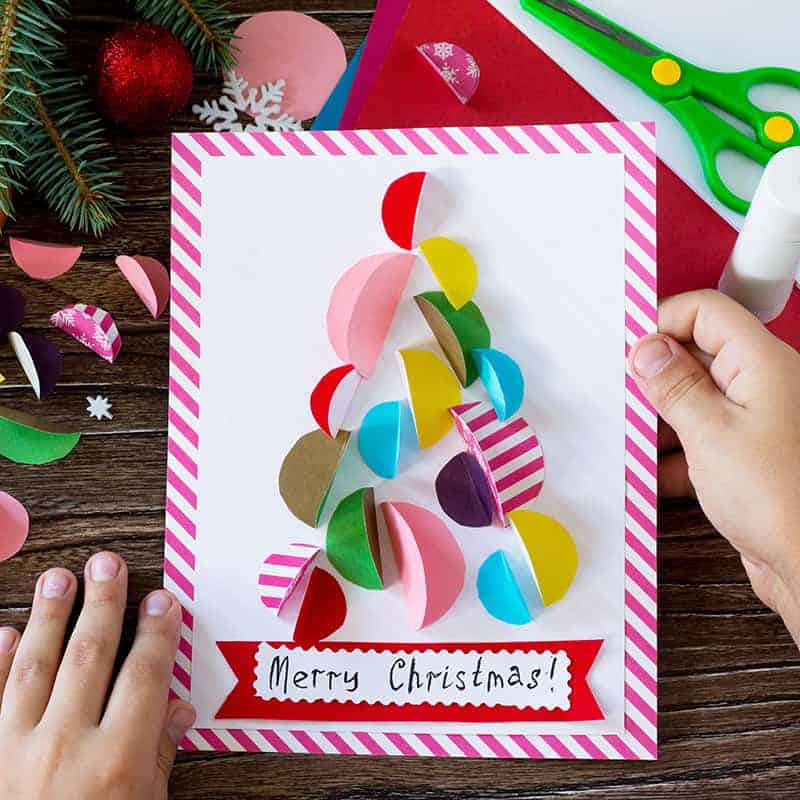
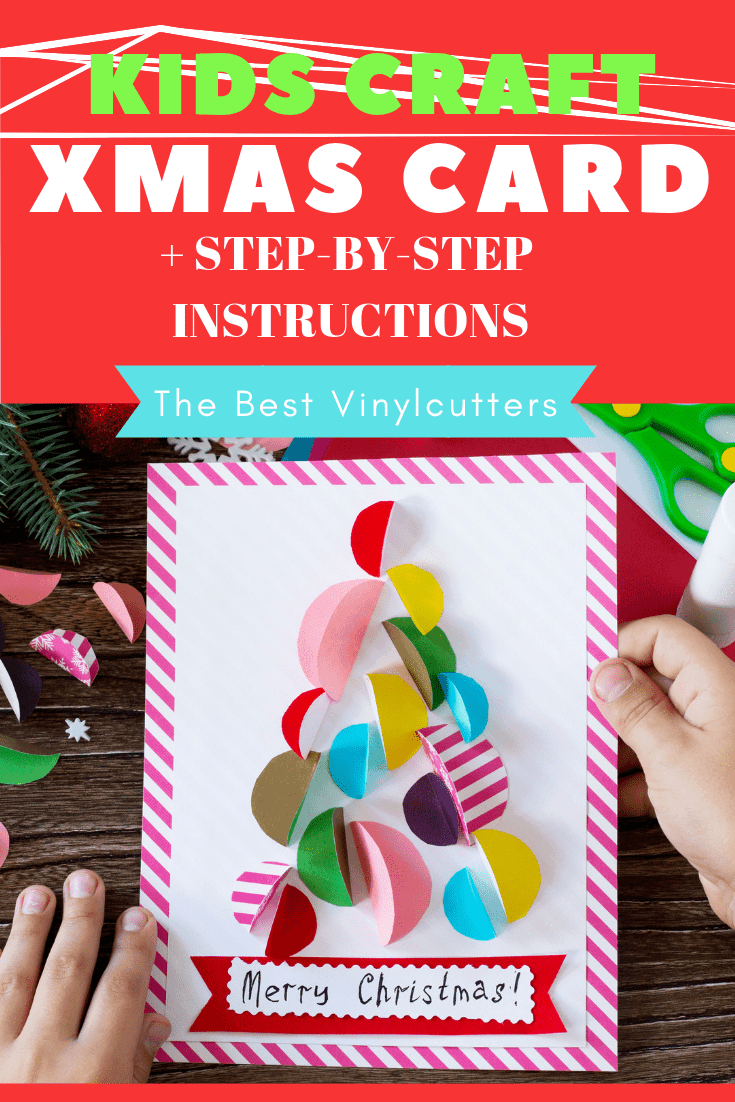
Fun and Easy DIY Christmas Card Craft Idea for Kids (or Adults)
Looking for really fun and easy Christmas card to make with your kid/s?
Our DIY Christmas Card Craft for kids is perfectly geared for children aged 8+. You will be able to enjoy this project with kids of younger age, however, I would expect that you would need to be more hands-on with helping out during each step.
You can find the full step-by-step tutorial on how to create this gorgeous Christmas card below.
DIY Christmas Card Craft Idea for Kids
Find below the supply list as well as the step-by-step tutorial to show you how you can create this easy and beautiful Christmas card.
-
Supply List:
- 1 x Double-Sided Patterned Paper (12 x 12")
- 1 x White Cardstock or Paper (A4 in size)
- A Range of Colored Paper for the Tree Circles (A4 in size)
- Scissors
- Decorative Edge Scissors
- Paper Trimmer (Not Essential but Helpful)
- Glue
- Black Pen
- A Way to Make Circles (I'll discuss these below)
Easiest Ways to Create your Circles:
Here are a few ways in which you can easily create some circles for the card.
- Use Circle Punches. Kids love using punches, so you can easily leave your child to punch out some circles to their heart's content. You can even buy circle punches in sets of 3 to get the different size circles that you are after. Here are some great circle punches on Amazon.
- Use a manual or electronic die cutting machine. Manual die cutting machines are pretty cheap. You can pick up a Cricut Cuttlebug Die Cutter for under $100. Grab a circle die from Amazon here. My kids LOVE LOVE LOVE cranking the handle of a manual die cutter to cut out circles. This is my preferred way of doing it as you can cut multiple layers at once.
- You can create some chipboard circles from lids or round objects from around the home. Your child can trace around these and then cut out the circles this way. Seems painful to me and will take forever - not to mention your child might get bored with it. But it is a cheap way to do it.
Instructions:
Step 1: Grab your patterned piece of paper and trim it down to an A4 size.
- If you have a trimmer, trim it to 12" x 8.5".
- If you don't have a trimmer, give your child an A4 sheet of cardstock. They can use a pencil and trace around this and then cut out the patterned paper along the pencil lines.
Fold this sheet in 1/2 to make a card. Set aside the rest of the patterned paper so you can use it to make circles for the tree.
Step 2: Trim down your white cardstock to around 5" x 7.5". Glue this piece down in the center on the front of your card.
Step 3: Create around 20 circles in different sizes and from a range of colors. We love to mix up solid colors with some double-sided patterned paper.
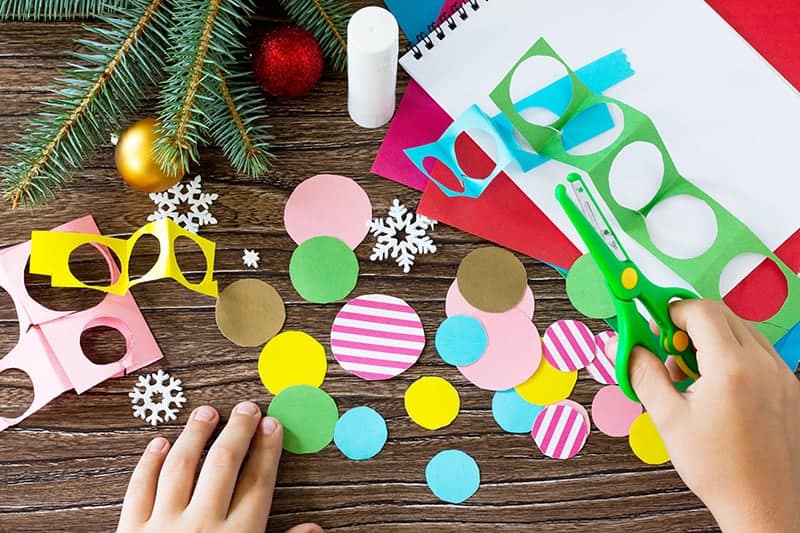
Step 4: Fold each of these circles in half.
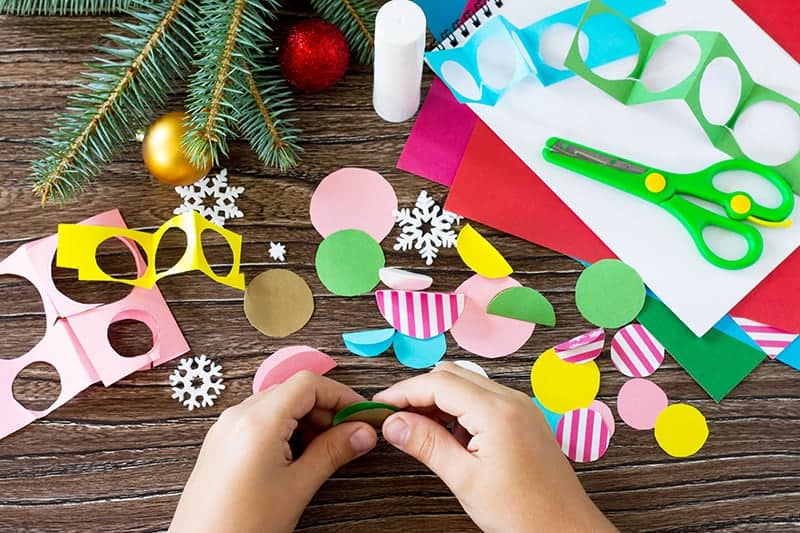
Step 5: Pop glue on one-half of the circles and glue these down in a triangle/tree shape on the patterned paper.
Tip: If your child is younger, you might wish to lightly draw a triangle shape on the cardstock so that your child can work inside the space.
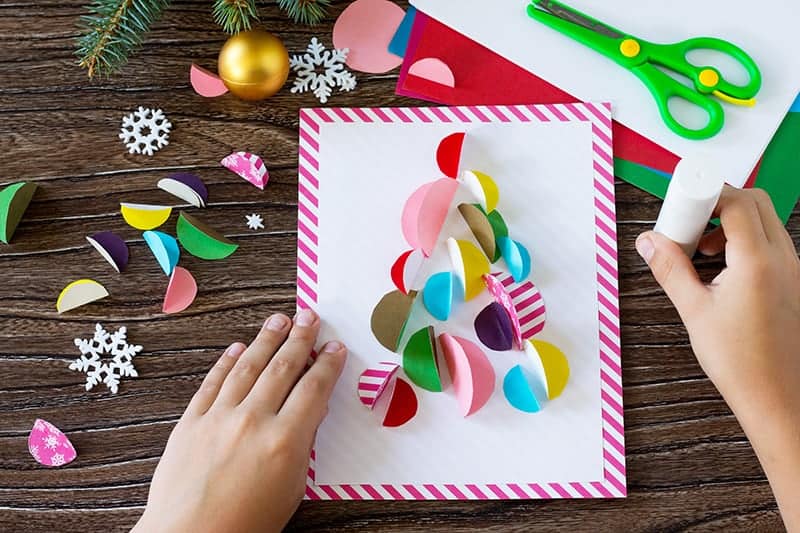
Step 6: Cut down a red piece of cardstock to around 4.5" x 1" in size. Cut a triangle shape out of each side of the rectangle to create a banner. (See photo below for visual example)
Step 7: With a pencil draw a rectangle on your white paper that measures 3.5" x 1". Use some decorative edge scissors to cut around the edge of this border. Glue this down on top of the red banner you created in the previous step.
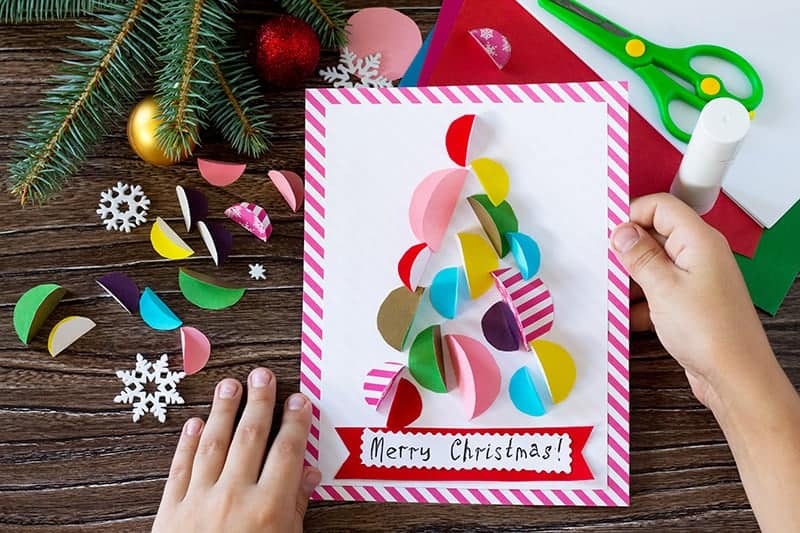
Step 8: Neatly write your Christmas message such as 'Merry Christmas' to finish off your card.
Alternative ideas to using circles from the paper:
If you don't want to use paper circles, you can also create a similar card from:
- Buttons
- Circle Stickers
- Die-Cut Snowflakes
- Circle Stamp and Ink/Paint
How to Make this Craft Easier for Younger Kids:
If your child is younger, you can always pre-cut all the elements for them so that they only have the task of folding and gluing down all the elements.
We hope you had fun spending some quality craft moments with your child. Now the challenge is to go and whip out a few more of these cards so that there are enough for all the family members.
Till next time,
Samantha xxx
Fun and Easy DIY Christmas Card Craft Idea for Kids (or Adults) is courtesy of: The Best Vinyl Cutters Blog
Wednesday, 21 November 2018
Easy DIY Stone Monsters Craft Tutorial for Kids
Looking for a super fun and crazy easy kids craft idea?
These crazy stone monsters are crazy for those rainy days. They are also brilliant to kill some time when the kids get bored over the school holidays.
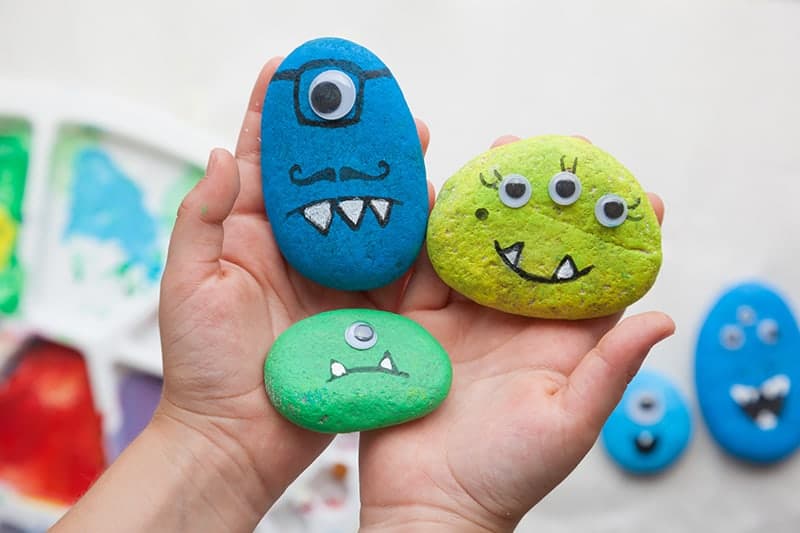
I find that the activity is best suited for kids aged 5+ simply due to the fact that they need to hand paint the mouths, but of course, you can easily customize this activity to suit toddlers up to 5 years as well.
To make the activity more suitable for younger kids, I highly recommend that you simply create some sticker mouths with your sticker vinyl cutting machine instead. They will have loads of fun sticking on those mouths and I'm sure you will end up with some truly weird and wonky monsters.
Click here to find the best vinyl cutting machine for stickers.
The rocks are really easy to make, but we have shared some step-by-step instructions below for those who wish to follow instructions.
DIY Monster Stone Crafts for Kids
Find below the materials needed as well as the step-by-step instructions to help you recreate these cool stone monsters.
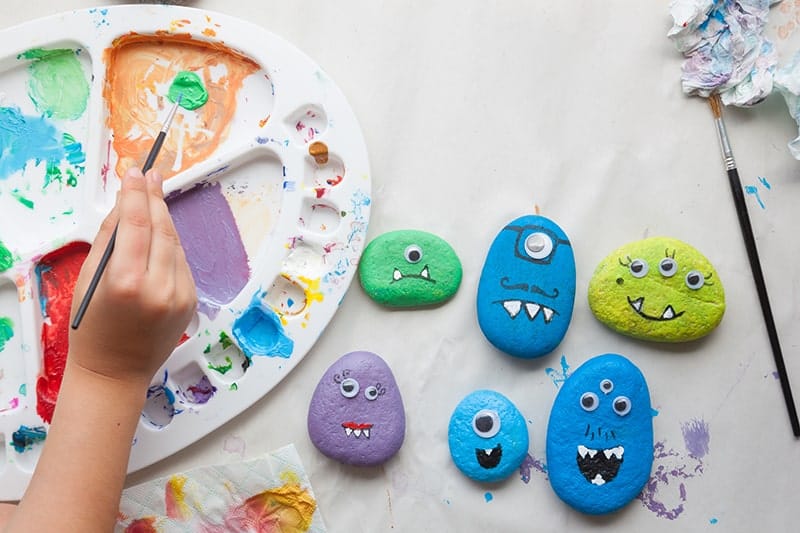
Supplies List:
- Smooth Stones for Craft Purposes
- Variety of Acrylic Paint Colors
- Paintbrushes
- Googly Eyes in Different Sizes
- Fast Drying Liquid Glue
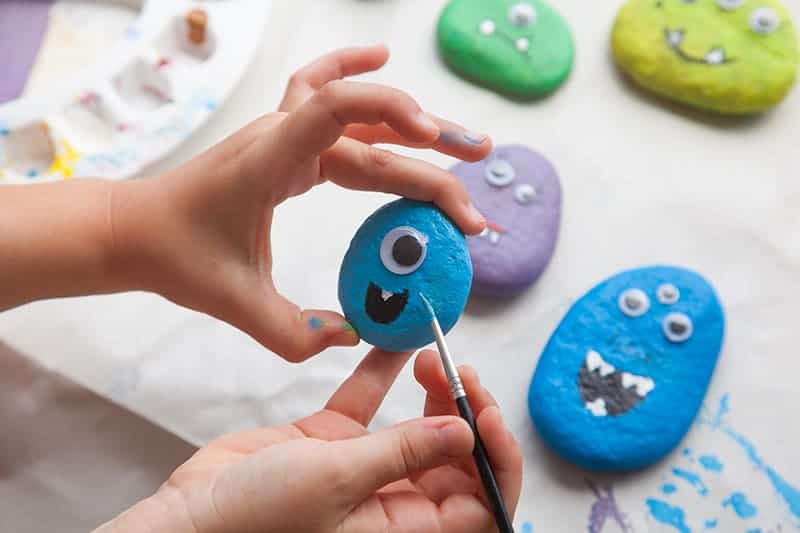
Instructions:
Step 1: Choose 5 stones and completely cover each stone in one color of paint. Set aside to dry (or use a hair dryer to speed up the process).
Step 2: Use the liquid glue and have some fun with adding some googly eyes. Use the photo below for inspiration. Really have a good think about what your monsters eyes should be like.
Try mixing up a larger eye with a smaller one. What about creating a 3 eyes monster, or maybe make a cyclops monster with only one big eye.
Step 3: Finish off your rocks by giving your monster a mouth. I find it easiest to use black for the mouth outline, white for the teeth and some red if they wish to add some lips. But of course these are monsters, so let your kids create whatever color mouth they wish to make.
Again you can use the photo below for inspiration or come up with your own fun designs.
Step 4: Set your monster stones aside to dry properly.
Now, remember the idea is to come up with some truly weird and wacky ideas. So step away from the normal and really truly just let your mind go crazy with ideas.
Here are some more rock designs to get your brain ticking.

This stone art and craft project is lots of fun to do. I find that girls and boys both equally enjoy creating these rock monsters.
I would love to know if you are planning on making these monsters. I find it fascinating seeing what the kids come up with - it is like a little peek into their imagination - fabulous!
Well, that is all from me.
Till next time,
Samantha xxx
Easy DIY Stone Monsters Craft Tutorial for Kids is courtesy of: Blog: The Best Vinyl Cutters
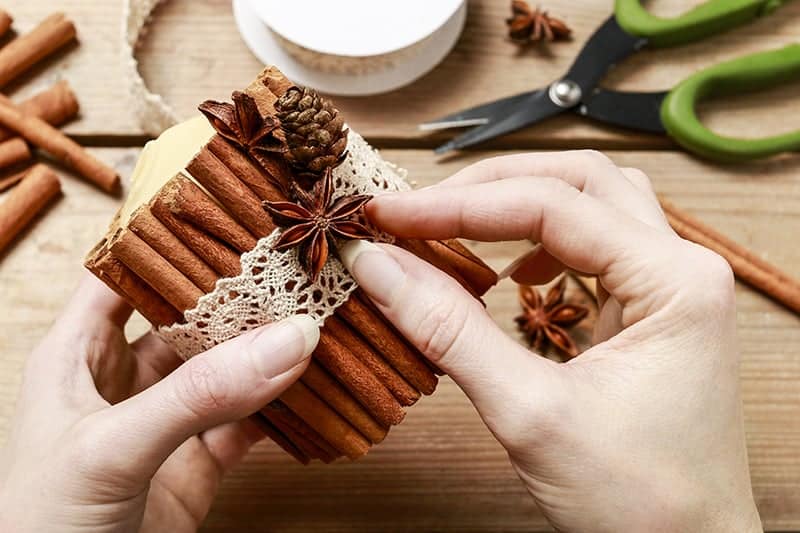
Easy 2 Step DIY Cinnamon Stick Candle Gift Tutorial
I think this might just be one of the best gift ideas. Not only it is beautiful, but it is cheap to make, takes only 2 steps to create and it is easy to customize depending on the occasion.

Of course, you could create these for yourself. We love using them as table decorations when we invite family or friends over on special occasions.
You can image what beautiful aromas these candles have - I love the smell of cinnamon sticks!
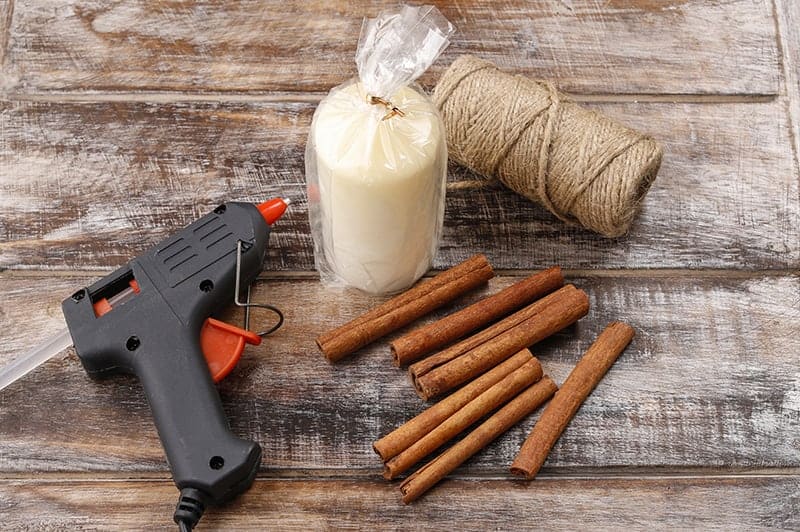
1 x Unscented Candle
1 x Packet of Cinnamon Sticks
Jute Twine
Hot Glue Gun and Glue Sticks
Optional: Ribbon, Lace, Star Anise, Baby Cones etc.
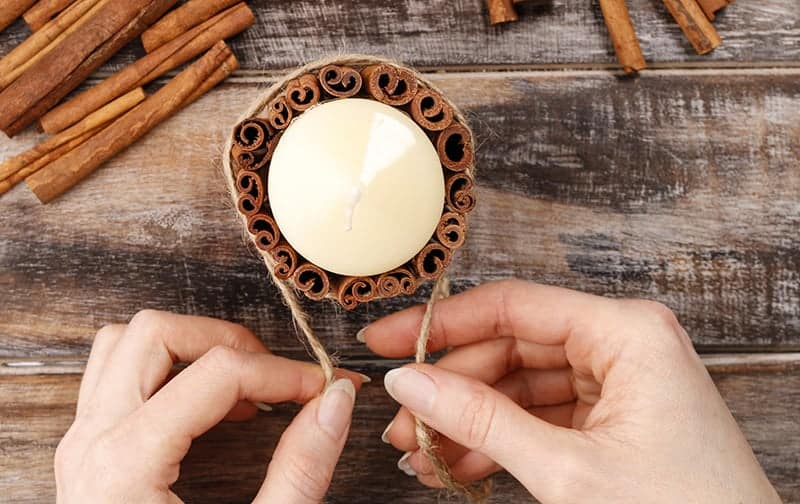
Step 2: Cut off a long piece of the twine and wrap it around your cinnamon sticks a few times, before tying it in a bow.
And that might possibly be one of the quickest and easiest DIY gifts that you have ever made!? And how effective does it look!


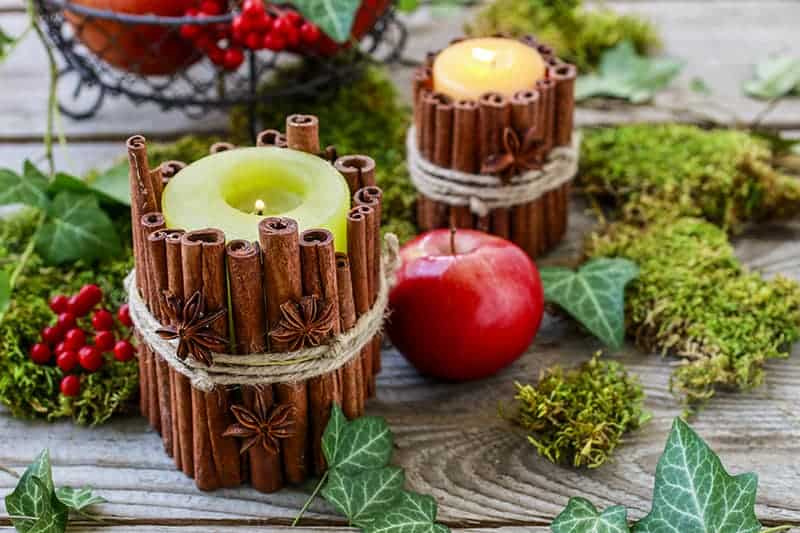
Embellish the candle with 2 Star Anise and one baby cone. Super elegant and perfect as a Christmas DIY gift.
We love using our die cutting machine to simply whip up some beautiful die cuts. You can stamp a birthday message on the die cut, punch a hole at the top and add it to the twine as your birthday card.
These are fabulous, aren't they? We are so might chuffed with this idea and I hope you love it too.
Till next time,
Samantha xxx
The following blog post Easy 2 Step DIY Cinnamon Stick Candle Gift Tutorial is available on: thebestvinylcutters.com
Of course, you could create these for yourself. We love using them as table decorations when we invite family or friends over on special occasions.
You can image what beautiful aromas these candles have - I love the smell of cinnamon sticks!
Easy 2 Step-Only DIY Cinnamon Stick Candle Tutorial
Find below the steps to show you how easy it is to whip up these beautiful candle gifts.
Supply List:
1 x Unscented Candle
1 x Packet of Cinnamon Sticks
Jute Twine
Hot Glue Gun and Glue Sticks
Optional: Ribbon, Lace, Star Anise, Baby Cones etc.
Instructions:
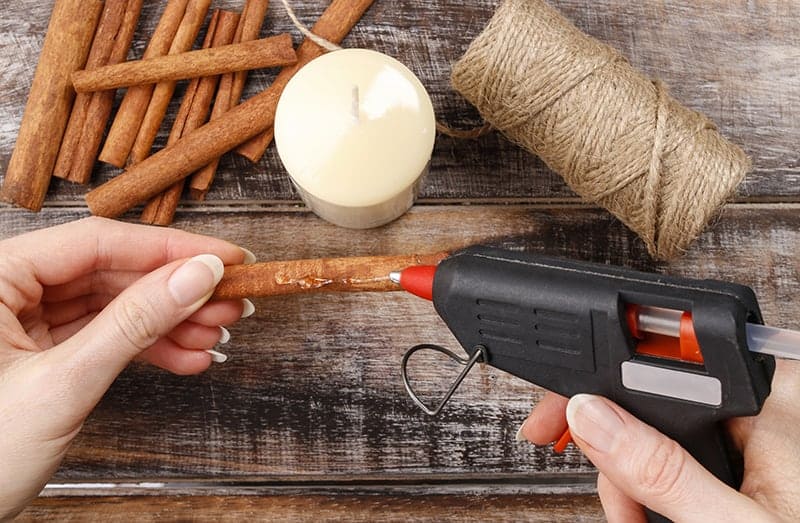
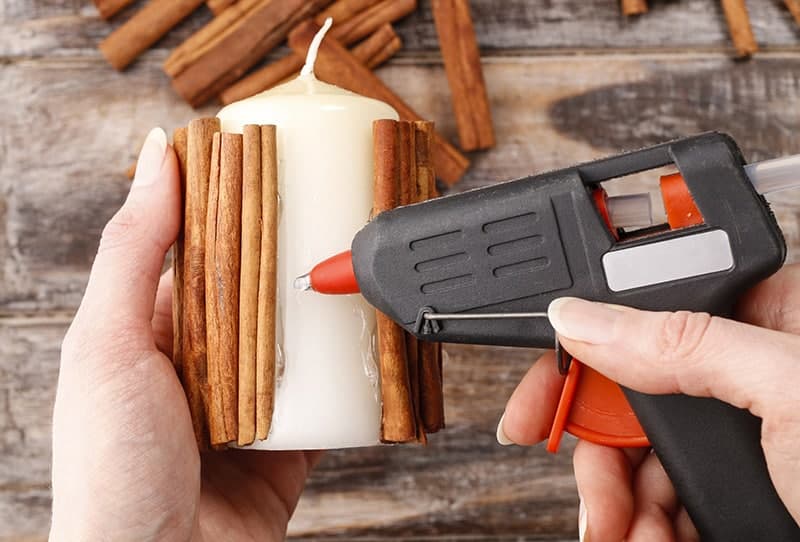
Step 1: Heat up your glue gun and simply stick your cinnamon sticks onto the candle with some hot glue. Repeat until you have covered the whole candle.Step 2: Cut off a long piece of the twine and wrap it around your cinnamon sticks a few times, before tying it in a bow.
And that might possibly be one of the quickest and easiest DIY gifts that you have ever made!? And how effective does it look!
Now how about we show you how you can add some beautiful variations to this candle. You can easily theme it for any special occasion.
Idea 1: DIY Gift Idea for Valentines
Use a red candle instead of the white. Use a red bow to tie off the cinnamon sticks. Super easy, super sweet and perfect for that someone special on Valentine's day.Idea 2: DIY Gift Idea for a Birthday
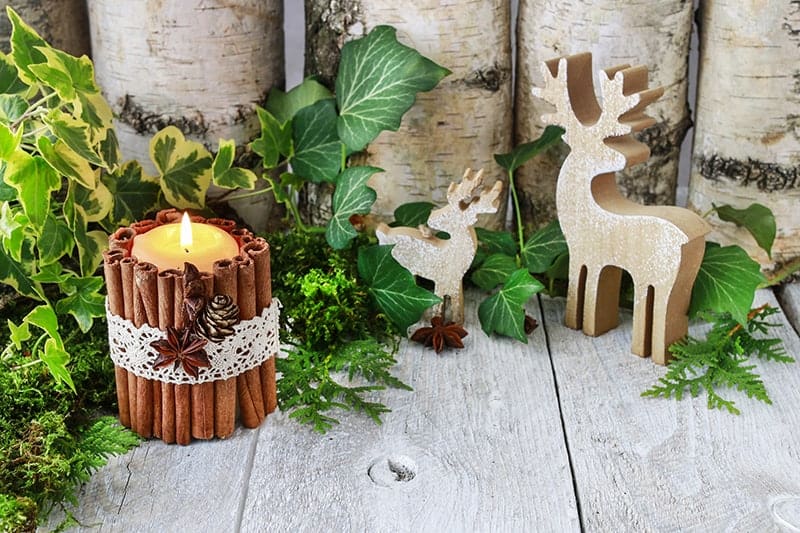
Take your basic candle idea one step further. Use a lovely colored candle in the center. Follow the tutorial above, but instead of tying a bow with the twine, think about adding some knots instead. Then add some beautiful Star Anise. You can simply use your hot glue and glue them onto the decorated candle.Idea 3: DIY Gift Idea for Christmas
Step up your game with these simple additional extras. Use a lovely soft cream colored candle. Surround your candles with cinnamon sticks. This time tie it all together with a beautifully soft piece of lace.Embellish the candle with 2 Star Anise and one baby cone. Super elegant and perfect as a Christmas DIY gift.
Now, all you have to do is to prepare it for gifting.I love pairing up the candle with a few other bits and pieces, such as a nice packet of bath salts, or a gift card to a cooking store or a voucher for a spa treatment. Simply wrap it up in brown paper, tie it together with some twine.
We love using our die cutting machine to simply whip up some beautiful die cuts. You can stamp a birthday message on the die cut, punch a hole at the top and add it to the twine as your birthday card.
These are fabulous, aren't they? We are so might chuffed with this idea and I hope you love it too.
Till next time,
Samantha xxx
The following blog post Easy 2 Step DIY Cinnamon Stick Candle Gift Tutorial is available on: thebestvinylcutters.com
Subscribe to:
Posts (Atom)